Showing posts with label HIbernate. Show all posts

Sunday, July 5, 2020

Setting up Keycloak 10 with MySQL 8 on your Windows machine

Keycloak is a very good Identity and Access Management solution from Red Hat. It is open-source and works straight out of the box on most operating systems, including Windows. Keycloak allows you to secure your applications and services with the best in class security measures like OpenID, OAuth2, et-al. Please refer to the official site for more details.

I have started using it as the standard for all application security and user management needs. I will share my experiences of using Keycloak to secure Spring Boot traditional MVC apps as well as microservices in a future series of posts.

Purpose of this blog post

There are many good resources on setting up Keycloak on your local machine and in the cloud. The official documentation is a good place to start.

This blog post is NOT about setting up Keycloak to serve as a full fledged Identity and Access Management solution but about setting up an external database for Keycloak to store its data and the realms, users, roles, credentials, etc created by you.

Keycloak comes with a built-in in-memory H2 database out of the box. This is good for getting started with Keycloak on your development machine, but not recommended for using in a production environment. This blog post is about using a database like MySQL (version 8) as the Keycloak database instead of the default in-memory H2 database. Once you understand how it is done, then you can do the same on your production server.

One small note - I am sharing my experiences and success on Windows and so this blog post will show how it is done on Windows. I am sure the same steps can be replicated after adjusting for other operating systems to achieve the same.

Problems when setting up on Windows 10

I use Windows as my development machine and I came across many errors and failed to set up KeyCloak with MySQL on my Windows machine at first go, despite following the official documentation and some blog posts. This is my attempt to record this here so that it might be useful to some of you who face problems setting up on Windows.

Here is a small subset of the issues I faced - Basically Keycloak was able to connect with a local Postgresql database but not with a MySQL database. So after lot of searching and trying things on my own, borrowing from my experience, I was able to make it all work. I noted down the steps I performed. Now I am sharing them so that you can save time if you face similar issues.

Versions used in this blog post

  • Keycloak 10.0.2 - Download
    • Follow the official guide to setup the server. I have installed it to D:\keycloak on my Windows machine.
  • MySQL Community Server 8.0.20 - Download
    • Follow the official guide to setup the database server. I have used WampServer to install MySQL versions 5 and 8 on my Windows machine. Details in the next section.
  • MySQL Connector for Java (Connector/J) - Download
    • This is needed for Keycloak to talk to the MySQL database. I have downloaded the latest Platform Independent version mysql-connector-java-8.0.20.jar
    • Extract and place this jar file in a convenient location for adding it to the module as explained in later sections. I have placed it in D:\ on my Windows machine.

Useful tools

Though I prefer the command line for many tasks, sometimes a GUI tool helps getting things done quicker. I use the following tools. You don't have to use the same or use such tools at all.
  • HeidiSQL - Database Management GUI tool - Download
    • This is a free open-source tool, actively maintained and released with new features and bug fixes, which I find very useful.
  • WampServer - Download from an aletrnative site which has more related options and tools
    • This is a free open-source tool which installs the MySQL, Apache HTTP server and PHP stack - LAMP stack on your Windows machine. It also allows you to have multiple versions of MySQL on your machine as some of your projects might still be on legacy MySQL version 5.7.x

Assumptions

I am assuming that you have installed Keycloak and MySQL. You have configured them enough to be operational as intended. Please go through the official documentation of each to setup and configure just enough. I will show you how the Connector/J comes into the picture further down.

Basic Steps

Keycloak uses the JBoss Wildfly server under the hood. If you know how to use the JBoss/Wildfly CLI and add a datasource to Wildfly, then you might not need to follow all the steps shown here.

Here are the basic steps for configuring your MySQL database as the Keycloak database.
  • Create a MySQL database, say, keycloakdb with a user, say, keycloakadmin in your MySQL and grant all privileges to this user
  • Add a module to the Keycloak (Wildfly) server defining your MySQL database and define a datasource along with the database driver (Connector/J), database user credentials, etc.
  • Restart your Keycloak server
I will detail every step next.

Using JBoss/Wildfly CLI

The official documentation shows the files in Keycloak that you need to edit to configure your database. I have found that manually editing the files can sometimes lead to a problem. I could not pin point the exact reason when I tried, but being a newbie with Wildfly, I realized that using the CLI is a much better way to achieve these steps. Using the CLI works; and you don't have to troubleshoot if your configuration did not work as intended.

Step 1: Create a database in MySQL

Using the MySQL shell (or a GUI tool) create a database in MySQL with the utf8 character set and the collation as utf8_unicode_ci. This is important as Keycloak requires UTF8 (for a few columns) and the official documentation states so here.

CREATE DATABASE keycloakdb CHARACTER SET utf8 COLLATE utf8_unicode_ci;


Step 2: Create a database user for Keycloak

Now you need to create a user and grant privileges. Follow these commands if you are using the MySQL command line (and not a GUI tool). Note that I have used a simple password which is not secure. On production systems, the passwords need to be very secure with features like upper and lower case characters, special characters, numbers, etc. For purpose of this blog post, a simple password is good enough.

CREATE USER 'keycloakadmin'@'%' IDENTIFIED WITH mysql_native_password BY 'keycloak123';

Why use mysql_native_password when creating a user?

From MySQL 8.0.x, caching_sha2_password is the default authentication plugin. Upto MySQL 5.x the default authentication plugin was mysql_native_password. Since a development environment, like mine, has two different versions of MySQL to support some legacy projects, I recommend using the older mysql_native_password authentication plugin. If you are just using the latest MySQL 8 for all your development, then you need not use the mysql_native_password keyword in the SQL command shown above.

Step 3: Grant all privileges

You can fine tune the privileges later by reading the Keycloak documentation in detail or talking to your DBA, but for setting up the Keycloak database user, just grant all privileges initially. As far as I know, I am sure that the database user requires all privileges.

GRANT ALL PRIVILEGES ON keycloakdb.* TO 'keycloakadmin'@'%';
--- Tell the server to reload the grant tables
--- by performing a flush privileges operation
FLUSH PRIVILEGES;


Step 4: Ensure that your databse engine is InnoDB

MySQL has several database storage engines with MyISAM and InnoDB being the most prominent. There are many reasons to use one over the other, but that discussion is beyond the scope of this blog post. After reading a lot about this topic, like the documentation for Keycloak and MySQL 8, I found that for the Keycloak database, MySQL 8 storage engine should be set to InnoDB, if it is not set already.

You can check the storage engine by following the MySQL documentation or by using MySQL commands like the following -

--- Should output: default_storage_engine InnoDB
SHOW GLOBAL variables like "default_storage%"

--- If storage engine is not InnoDB, use this to set it
SET GLOBAL default_storage_engine = 'InnoDB';


Step 5: Adding a module with the MySQL driver (Connector/J) to Keycloak

This is about telling Keycloak the database connector/driver you will be using to connect Keycloak to your MySQL database. As I said earlier, I have realized that using the JBoss/Wildfly CLI is the optimal way to configure Keycloak. So I will show you how to add a module using the CLI.

You need to run the Keycloak server so that the JBoss/Wildfly CLI tool can connect to the running server and further actions can be performed.

From the /bin directory of your keycloak installation, run the standalone.bat batch file.


Your command/console window should now show you the regular Keycloak messages and indicate that the server is running.

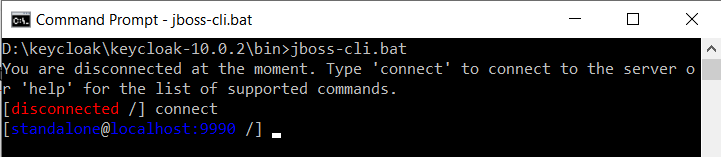
Start another command prompt.

From the /bin directory of your keycloak installation, run the jboss-cli.bat batch file.


Now enter the connect command to connect to the Keycloak server.


Now enter the following command on the console. Note that the command is all in one line. If it is showing up in multiple lines, then it is because of the responsive design and layout of this blog post.

module add --name=com.mysql --dependencies=javax.api,javax.transaction.api --resources=D:/mysql-connector-java-8.0.20.jar --module-root-dir=../modules/system/layers/keycloak/


What did this module add command do?

The above command created a directory structure inside your {Keycloak-Directory}\modules\system\layers\keycloak/ directory and added a module.xml file. After executing the module add command you should see a module file at D:\keycloak\keycloak-10.0.2\modules\system\layers\keycloak\com\mysql\main\module.xml

The module.xml file looks like the XML snippet below. Notice that the connector jar has also been copied inside this newly created directory by this command. So now Keycloak knows the definition of your database connector and the location of the jar file too.

<?xml version='1.0' encoding='UTF-8'?>

<module xmlns="urn:jboss:module:1.1" name="com.mysql">

    <resources>
        <resource-root path="mysql-connector-java-8.0.20.jar"/>
    </resources>

    <dependencies>
        <module name="javax.api"/>
        <module name="javax.transaction.api"/>
    </dependencies>
</module>


Step 6: Defining a data source

Now that Keycloak knows about the database connector through its modules, its time to actually define a data source. This will allow Keycloak to connect to your MySQL database instead of the built-in H2 database.

  • First, go to your {Keycloak-Directory}\standalone\configuration\ and open the standalone.xml file in your text editor.
  • Search for the word KeycloakDS and you should see a section defining a data source and database driver for the default H2 database the XML snippet below.
  • You need to do two things - replace the KeycloakDS data source and the database connection driver defined for H2 with your MySQL database.

<datasource jndi-name="java:jboss/datasources/KeycloakDS" pool-name="KeycloakDS" enabled="true" 
    use-java-context="true" 
    statistics-enabled="${wildfly.datasources.statistics-enabled:${wildfly.statistics-enabled:false}}">
  <connection-url>jdbc:h2:${jboss.server.data.dir}/keycloak;AUTO_SERVER=TRUE</connection-url>
  <driver>h2</driver>
  <security>
    <user-name>sa</user-name>
    <password>sa</password>
  </security>
</datasource>
<drivers>
  <driver name="h2" module="com.h2database.h2">
    <xa-datasource-class>org.h2.jdbcx.JdbcDataSource</xa-datasource-class>
  </driver>
</drivers>

The above two tasks can be achieved using the CLI (and I recommend this versus manually editing the configuration in standalone.xml)

Remove the existing datasource

  • Enter the following command in the console to first remove the KeycloakDS

/subsystem=datasources/data-source=KeycloakDS:remove
  • You should see console messages indicating success, like in the screen shot below.


Define your MySQL based driver and data source

  • Enter the following command in the console to define the MySQL driver

/subsystem=datasources/jdbc-driver=mysql:add(driver-name=mysql,driver-module-name=com.mysql,driver-class-name=com.mysql.cj.jdbc.Driver)

  • You should see console messages indicating success, like in the screen shot below.


  • Enter the following command in the console to define the MySQL data source
data-source add --name=KeycloakDS --jndi-name=java:jboss/datasources/KeycloakDS --enabled=true --password=keycloak123 --user-name=keycloakadmin --driver-name=com.mysql --use-java-context=true --connection-url=jdbc:mysql://localhost:3306/keycloakdb?useSSL=false&characterEncoding=UTF-8


  • You should see console messages indicating success, like in the screen shot below.

  • If you take a quick look at your standalone.xml file, your data source should now look like the XML snippet below

<datasource jndi-name="java:jboss/datasources/KeycloakDS" pool-name="KeycloakDS" enabled="true" use-java-context="true">
    <connection-url>jdbc:mysql://localhost:3306/keycloakdb?useSSL=false&amp;characterEncoding=UTF-8</connection-url>
    <driver>com.mysql</driver>
    <security>
        <user-name>keycloakadmin</user-name>
        <password>keycloak123</password>
    </security>
</datasource>
<drivers>
    <driver name="h2" module="com.h2database.h2">
        <xa-datasource-class>org.h2.jdbcx.JdbcDataSource</xa-datasource-class>
    </driver>
    <driver name="com.mysql" module="com.mysql">
        <driver-class>com.mysql.cj.jdbc.Driver</driver-class>
    </driver>
</drivers>

  • There is much more you can do to the datasource configuration like add connection pooling, connection validators, exception handlers, etc. I have not covered all these options as the purpose is to get MySQL connected as the Keycloak database for a development environment. Detailed official documentation about Wildfly server and data sources is available here.
  • For example, you can manually add connection pooling to the data source configuration (or use the JBoss/Wildfly CLI options) like the XML snippet below.

...
<driver>com.mysql</driver>
    <pool>
        <min-pool-size>4</min-pool-size>
        <initial-pool-size>4</initial-pool-size>
        <max-pool-size>64</max-pool-size>
    </pool>
    <security>
...

  • You can add some validators to your data source like the XML snippet below.
...
    </security>
    <validation>
      <valid-connection-checker class-name="org.jboss.jca.adapters.jdbc.extensions.mysql.MySQLValidConnectionChecker"/>
      <validate-on-match>true</validate-on-match>
      <exception-sorter class-name="org.jboss.jca.adapters.jdbc.extensions.mysql.MySQLExceptionSorter"/>
  </validation> 
</datasource>
...

About the character encoding parameter in the jdbc connection url

Please note that Keycloak requires that your database be capable of storing data in UTF8 format. Similarly, the connection url also needs to specify that the connection can handle UTF8 data. More details in the official guide here.

Test your database connection

After the above two steps you should test if Keycloak can reach your database.
  • Enter the following command in the console to test database connectivity

/subsystem=datasources/data-source=KeycloakDS:test-connection-in-pool

  • You should see console messages indicating success, like in the screen shot below.


Step 7: Database configuration

You are near the very end of your configuration, but please understand the following. Keycloak allows you to customize code and configuration via their SPI or Service Provider Interface facility. For the database configuration it means ensuring that some of the parameters are set properly for Keycloak to create the required tables and apply required constraints in the keycloakdb database in your MySQL.

  • Open the standalone.xml file once again in your text editor and search for connectionsJpa
  • You should see configuration like the XML snippet below
<spi name="connectionsJpa">
  <provider name="default" enabled="true">
    <properties>
      <property name="dataSource" value="java:jboss/datasources/KeycloakDS"/>
      <property name="initializeEmpty" value="true"/>
      <property name="migrationStrategy" value="update"/>
      <property name="migrationExport" value="${jboss.home.dir}/keycloak-database-update.sql"/>
    </properties>
  </provider>
</spi>

  • This section is about telling Keycloak if you want your MySQL database to be initialized for you. Remember that Keycloak uses JPA too for connecting to your database. So the underlying provider is Hibernate. If you have ever worked with Hibernate then you know about configurations like ddl-auto. These configuration parameters are something similar. Please refer to the official documentation here for more details.


Step 8: Restarting Keycloak server

  • Note that Keycloak was started for configuring MySQL but its administrative UI was not accesssed nor was an administrator user added to it. It is not mandatory, but I prefer adding an intial admin user to Keycloak in the master realm. You can add a admin user via the Keycloak Admin Console UI or via the Keycloak CLI.
  • Enter the following command from the /bin directory to add a Keycloak user to the master realm.
add-user-keycloak.bat -u superadmin -p superadmin -r master
  • You are almost done! You need to restart Keycloak so that when it boots up, it will now use the KeycloakDS data source and connect with your MySQL database. This will also allow you to check the tables and constraints added by Keycloak to your database.

Checking Keycloak log messages to see that MySQL connectivity is working as expected

Once you restart the Keycloak server, you can check the log messages. You should see messages like the following, indicating success.
...
[org.jboss.as.connector.subsystems.datasources] (ServerService Thread Pool -- 32) WFLYJCA0005: Deploying non-JDBC-compliant driver class com.mysql.cj.jdbc.Driver (version 8.0)
...
org.jboss.as.connector.deployers.jdbc] (MSC service thread 1-3) WFLYJCA0018: Started Driver service with driver-name = com.mysql
...
[org.hibernate.jpa.internal.util.LogHelper] (ServerService Thread Pool -- 59) HHH000204: Processing PersistenceUnitInfo [
        name: keycloak-default
        ...]
...

About the log message - Deploying non-JDBC-compliant driver class com.mysql.cj.jdbc.Driver

  • Do not worry about that message. Your configuration will work despite this message. It is a known bug. Please see this.
  • The simple explanation for this message is that the JDBC driver must have SQL support conforming to the entry level of the SQL92 standard. Unfortunately, MySQL does not support all features that are required by that standard. So JBoss/Wildfly just reports that the driver is not fully compliant. It does not affect the working of your MySQL as the Keycloak database.

Wrapping up

You are now ready to use your MySQL database as the Keycloak data store. I have shown how to configure this on a Windows machine for development purpose. In a real life production scenario, you will probably not run a standalone instance of Keycloak; but most likely clustered mode. Please refer to the official documentation about operating modes.These techniques I have shared will be applicable to those configurations too.

Happy Keycloak-ing! :)

Wednesday, April 25, 2018

Spring Boot 2 generic JPA converter to encrypt and decrypt an entity attribute

A recent requirement in my work mandated that certain columns in a table be encrypted when stored in the database. One can use the javax.crypto package from the standard JDK to achieve this by writing service layer code to encrypt and decrypt data for each entity attribute (table column) that required it.

The entire code-base is built using Spring Boot 2 and JPA (Hibernate), so I was looking for a way to achieve the encryption and decryption without having to write code for each entity attribute.  Well, there is such a feature provided by JPA called Converters which provide a way for you to write code once and then apply it to any required table attribute by way of a simple @Converter annotation.

Purpose of this blog post

JPA allows writing 'conversion' code so that an entity attribute (table column) can be converted from one type to another and back. Though this is not a latest feature of JPA nor a bleeding edge topic, I am sharing how I wrote a generic converter for encryption and decryption of a string type table column.

Java and Cryptography

The humble JDK provides a very good cryptography package javax.crypto which provides many facilities to do all things related to cryptography, one of which is to encrypt and decrypt data (or strings). I will not go into the details but just note here that the javax.crypto.Cipher class provides the functionality of a cryptographic cipher or algorithm for encryption and decryption.

How does cryptography work?

I am not a cryptography expert, but understand enough of it to apply it to the problem at hand. Basically I want to encrypt a String and write it to a table column in the database and then decrypt it after reading it so that the other layers in the application can use it.

The crypto facilities basically use an ecryption/decryption algorithm to encrypt/decrypt the string and secure the data by applying a key value, which only you know, to encrpt/decrypt the data. That's it in a nutshell.

For more details on how Java cryptography works please see this excellent tutorial

JPA and Converter

JPA allows you to apply a @Converter annotation to any Entity attribute i.e. to any table column definition in your table defintion. This is possible via the AttributeConveter interface. A class implementing this interface needs to implement the methods from this interface


  • Y convertToDatabaseColumn(X attribute) - Converts the value stored in the entity attribute into the data representation to be stored in the database.
  • X convertToEntityAttribute(Y dbData) -  Converts the data stored in the database column into the value to be stored in the entity attribute. Note that it is the responsibility of the converter writer to specify the correct dbData type for the corresponding column for use by the JDBC driver: i.e., persistence providers are not expected to do such type conversion.

Writing the generic attribute converter

I needed a converter which would essentially take a String type attribute and then encrypt it. So, the method Y convertToDatabaseColumn(X attribute) method needed to take a string and return an encrypted version of it for storage.

The converter also has to read the stored encrypted string  and return the decrypted version. So, the method  X convertToEntityAttribute(Y dbData) needed to take the encrypted String, decrypt it and and return it to the other layers of the JPA mechanism.

One thought that came naturally to mind, was that I didn't want to write code once again when the need arose to encrypt and decrypt some other type of attribute, say a Date or something else. So the base attribute converter had to have just enough code to perform the encryption and decryption of a String. (Note that we want to store the data as an encrypted String in the table column). The other task of converting the entity attribute type to a String and vice versa would have to be done outside this base class to allow flexibility to allow using any attribute entity type.

With these points in mind, here is how I wrote this attribute converter.

Step 1 - Write the encryption and decryption code

As noted before, use Java cryptography to achieve encryption and decryption. For this a Cipher instance is needed with all its properties set appropriately. Then it can be used for encryption and decryption.

import java.security.InvalidAlgorithmParameterException;
import java.security.InvalidKeyException;
import java.security.Key;
import java.security.NoSuchAlgorithmException;
import java.security.spec.AlgorithmParameterSpec;

import javax.crypto.Cipher;
import javax.crypto.NoSuchPaddingException;
import javax.crypto.spec.IvParameterSpec;
import javax.crypto.spec.SecretKeySpec;

/**
 * Utility class to generate an instance of {@link javax.crypto.Cipher}
 * 
 * @author Sunit Katkar, sunitkatkar@gmail.com
 * @since ver 1.0 (Apr 2018)
 * @version 1.0
 */
public class CipherMaker {

    private static final String CIPHER_INSTANCE_NAME = "AES/CBC/PKCS5Padding";
    private static final String SECRET_KEY_ALGORITHM = "AES";

    /**
     * @param encryptionMode
     *            - decides whether to ecrypt or decrypt data. Values accepted:
     *            {@link Cipher#ENCRYPT_MODE} for encryption and
     *            {@link Cipher#DECRYPT_MODE} for decryption.
     * @param key
     *            - the key to use for encrypting or decrypting data. This can be a
     *            simple String like "MySecretKey" or a more complex, hard to guess
     *            longer string
     * @return
     * @throws InvalidKeyException
     * @throws NoSuchPaddingException
     * @throws NoSuchAlgorithmException
     * @throws InvalidAlgorithmParameterException
     * @throws InvalidKeyException
     * @throws InvalidAlgorithmParameterException
     */
    public Cipher configureAndGetInstance(int encryptionMode, String key)
            throws InvalidKeyException, NoSuchPaddingException, 
            NoSuchAlgorithmException, InvalidAlgorithmParameterException, 
            InvalidKeyException, InvalidAlgorithmParameterException {

        Cipher cipher = Cipher.getInstance(CIPHER_INSTANCE_NAME);
        Key secretKey = new SecretKeySpec(key.getBytes(), SECRET_KEY_ALGORITHM);

        byte[] ivBytes = new byte[cipher.getBlockSize()];
        AlgorithmParameterSpec algorithmParameters = new IvParameterSpec(ivBytes);

        cipher.init(encryptionMode, secretKey, algorithmParameters);
        return cipher;
    }
}

Step 2 - Write the base attribute converter 

As noted before, the attribute converter needs to encrypt and decrypt. So, the CipherMaker class above will be useful here. The source code comments are self-explanatory.

import static org.apache.commons.lang3.StringUtils.isNotEmpty;

import java.security.InvalidAlgorithmParameterException;
import java.security.InvalidKeyException;
import java.security.NoSuchAlgorithmException;
import java.util.Base64;

import javax.crypto.BadPaddingException;
import javax.crypto.Cipher;
import javax.crypto.IllegalBlockSizeException;
import javax.crypto.NoSuchPaddingException;
import javax.persistence.AttributeConverter;

/**
 * Abstract base class for implementing the JPA Attribute Converter which will
 * encrypt and decrypt an Entity attribute (table column)
 * 
 * @author Sunit Katkar, sunitkatkar@gmail.com
 * @since ver 1.0 (Apr 2018)
 * @version 1.0
 * @param <X>
 */
public abstract class AbstractEncryptDecryptConverter<X>
  implements AttributeConverter<X, String> {

 /**
  * This is the key required for encryption/decryption. This is defined here
  * for example purpose. In production, this should come from a secure
  * location not accessible easily. In Spring Boot, one possible location is
  * the application.properties file. Though its not the most secure way, it
  * will keep this key out of the actual java code.
  */
 private static final String SECRET_ENCRYPTION_KEY = "MySuperSecretKey";

 /** CipherMaker is needed to configure and create instance of Cipher */
 private CipherMaker cipherMaker;

 /**
  * Constructor
  * 
  * @param cipherMaker
  */
 public AbstractEncryptDecryptConverter(CipherMaker cipherMaker) {
  this.cipherMaker = cipherMaker;
 }

 /**
  * Default constructor
  */
 public AbstractEncryptDecryptConverter() {
  this(new CipherMaker());
 }

 /*
  * (non-Javadoc)
  * 
  * @see
  * javax.persistence.AttributeConverter#convertToDatabaseColumn(java.lang.
  * Object)
  */
 @Override
 public String convertToDatabaseColumn(X attribute) {
  if (isNotEmpty(SECRET_ENCRYPTION_KEY) && isNotNullOrEmpty(attribute)) {
   try {
    Cipher cipher = cipherMaker.configureAndGetInstance(
      Cipher.ENCRYPT_MODE, 
      SECRET_ENCRYPTION_KEY);
    return encryptData(cipher, attribute);
   } catch (NoSuchAlgorithmException 
     | InvalidKeyException
     | InvalidAlgorithmParameterException 
     | BadPaddingException
     | NoSuchPaddingException 
     | IllegalBlockSizeException e) {
    throw new RuntimeException(e);
   }
  }
  return convertEntityAttributeToString(attribute);
 }

 /*
  * (non-Javadoc)
  * 
  * @see
  * javax.persistence.AttributeConverter#convertToEntityAttribute(java.lang.
  * Object)
  */
 @Override
 public X convertToEntityAttribute(String dbData) {
  if (isNotEmpty(SECRET_ENCRYPTION_KEY) && isNotEmpty(dbData)) {
   try {
    Cipher cipher = cipherMaker.configureAndGetInstance(
      Cipher.DECRYPT_MODE, 
      SECRET_ENCRYPTION_KEY);
    return decryptData(cipher, dbData);
   } catch (NoSuchAlgorithmException 
     | InvalidAlgorithmParameterException
     | InvalidKeyException 
     | BadPaddingException
     | NoSuchPaddingException 
     | IllegalBlockSizeException e) {
    throw new RuntimeException(e);
   }
  }
  return convertStringToEntityAttribute(dbData);
 }

 /**
  * The concrete class which implements this abstract class will have to
  * provide the implementation. For simple String encryption, the
  * implementation is simple as apache commons lang StringUtils can be used.
  * But this method was abstracted out as there might be other types of null
  * check technique required when a non String entity is to be encrypted
  * 
  * @param attribute
  * @return
  */
 abstract boolean isNotNullOrEmpty(X attribute);

 /**
  * The concrete class which implements this abstract class will have to
  * provide the implementation. For decryption of a String, its simple as a
  * String has to be returned, but for other non String types some more code
  * might have to be implemented. For example, a Date type of Date string.
  * 
  * @param dbData
  * @return
  */
 abstract X convertStringToEntityAttribute(String dbData);

 /**
  * The concrete class which implements this abstract class will have to
  * provide the implementation. For encryption of a String, its simple as a
  * String has to be returned, but for other non String types some more code
  * might have to be implemented. For example, a Date type of Date string.
  * 
  * @param attribute
  * @return
  */
 abstract String convertEntityAttributeToString(X attribute);

 /**
  * Helper method to encrypt data
  * 
  * @param cipher
  * @param attribute
  * @return
  * @throws IllegalBlockSizeException
  * @throws BadPaddingException
  */
 private String encryptData(Cipher cipher, X attribute)
   throws IllegalBlockSizeException, BadPaddingException {
  byte[] bytesToEncrypt = convertEntityAttributeToString(attribute)
    .getBytes();
  byte[] encryptedBytes = cipher.doFinal(bytesToEncrypt);
  return Base64.getEncoder().encodeToString(encryptedBytes);
 }

 /**
  * Helper method to decrypt data
  * 
  * @param cipher
  * @param dbData
  * @return
  * @throws IllegalBlockSizeException
  * @throws BadPaddingException
  */
 private X decryptData(Cipher cipher, String dbData)
   throws IllegalBlockSizeException, BadPaddingException {
  byte[] bytesToDecrypt = Base64.getDecoder().decode(dbData);
  byte[] decryptedBytes = cipher.doFinal(bytesToDecrypt);
  return convertStringToEntityAttribute(new String(decryptedBytes));
 }
}

Step 3 - Implementing the concrete String encryption/descryption JPA attribute converter

Now that the base class and crypto code is ready, the actual implementation for writing a string ecnryption/decryption JPA converter is quite easy.

/**
 * Concrete implementation of the {@link AbstractEncryptDecryptConverter}
 * abstract class to encrypt/decrypt an entity attribute of type
 * {@link java.lang.String} <br/>
 * Note: This is the class where the {@literal @}Converter annotation is applied
 * 
 * @author Sunit Katkar, sunitkatkar@gmail.com
 * @since ver 1.0 (Apr 2018)
 * @version 1.0 *
 */
@Converter(autoApply = false)
public class StringEncryptDecryptConverter
  extends AbstractEncryptDecryptConverter<String> {

 /**
  * Default constructor initializes with an instance of the
  * {@link CipherMaker} crypto class to get a {@link javax.crypto.Cipher}
  * instance
  */
 public StringEncryptDecryptConverter() {
  this(new CipherMaker());
 }

 /**
  * Constructor
  * 
  * @param cipherMaker
  */
 public StringEncryptDecryptConverter(CipherMaker cipherMaker) {
  super(cipherMaker);
 }

 @Override
 boolean isNotNullOrEmpty(String attribute) {
  return isNotEmpty(attribute);
 }

 @Override
 String convertStringToEntityAttribute(String dbData) {
  // the input is a string and output is a string
  return dbData;
 }

 @Override
 String convertEntityAttributeToString(String attribute) {
  // Here too the input is a string and output is a string
  return attribute;
 }
}

Step 4 - Using the String encryption/descryption JPA attribute converter

Using this JPA converter in a JPA Entity is just a matter of annotating the attribute with the @Convert annotation as shown below.

import java.io.Serializable;

import javax.persistence.Column;
import javax.persistence.Convert;
import javax.persistence.Entity;
import javax.persistence.GeneratedValue;
import javax.persistence.GenerationType;
import javax.persistence.Id;
import javax.persistence.Table;

/**
 * JPA Entity which will be saved in the database table named 'employee'. The
 * attribute (or table column) <tt>sensitiveData</tt> needs to be encrypted for
 * storage and decrypted when read.
 * 
 * @author Sunit Katkar, sunitkatkar@gmail.com
 * @since ver 1.0 (Apr 2018)
 * @version 1.0
 * @param <X>
 */
@Entity
@Table(name = "employee")
public class Employee implements Serializable {

 private static final long serialVersionUID = 1L;

 @Id
 @GeneratedValue(strategy = GenerationType.IDENTITY)
 @Column(name = "employee_id")
 private Long id;

 @Column(name = "first_name")
 private String firstName;

 @Column(name = "last_name")
 private String lastName;

 /**
  * This String attribute needs to be encrypted
  */
 @Column(name = "sensitive_data")
 @Convert(converter = StringEncryptDecryptConverter.class)
 private String sensitiveData;

 /**
  * @return the id
  */
 public Long getId() {
  return id;
 }

 /**
  * @param id
  *            the id to set
  */
 public void setId(Long id) {
  this.id = id;
 }

 /**
  * @return the firstName
  */
 public String getFirstName() {
  return firstName;
 }

 /**
  * @param firstName
  *            the firstName to set
  */
 public void setFirstName(String firstName) {
  this.firstName = firstName;
 }

 /**
  * @return the lastName
  */
 public String getLastName() {
  return lastName;
 }

 /**
  * @param lastName
  *            the lastName to set
  */
 public void setLastName(String lastName) {
  this.lastName = lastName;
 }

 /**
  * @return the sensitiveData
  */
 public String getSensitiveData() {
  return sensitiveData;
 }

 /**
  * @param sensitiveData
  *            the sensitveData to set
  */
 public void setSensitiveData(String sensitiveData) {
  this.sensitiveData = sensitiveData;
 }
}

Bonus - Converter to encrypt / decrypt LocalDate

Since the basic infrastructure for encrypting and decrypting JPA entity attributes is created, it can be used for converting other types of entities, for example, an attribute of type java.time.LocalDate. Here is the code to do that.

import static java.time.format.DateTimeFormatter.ISO_DATE;
import static org.apache.commons.lang3.StringUtils.isEmpty;

import java.time.LocalDate;

import javax.persistence.Converter;

/**
 * Concrete implementation of the {@link AbstractEncryptDecryptConverter}
 * abstract class to encrypt/decrypt an entity attribute of type
 * {@link java.time.LocalDate} <br/>
 * Note: This is the class where the {@literal @}Converter annotation is applied
 * 
 * @author Sunit Katkar, sunitkatkar@gmail.com
 * @since ver 1.0 (Apr 2018)
 * @version 1.0 *
 */
@Converter(autoApply = false)
public class LocalDateEncryptDecryptConverter
  extends AbstractEncryptDecryptConverter<LocalDate> {

 public LocalDateEncryptDecryptConverter() {
  this(new CipherMaker());
 }

 public LocalDateEncryptDecryptConverter(CipherMaker cipherMaker) {
  super(cipherMaker);
 }

 @Override
 boolean isNotNullOrEmpty(LocalDate attribute) {
  return attribute != null;
 }

 @Override
 LocalDate convertStringToEntityAttribute(String dbData) {
  return isEmpty(dbData) ? null : LocalDate.parse(dbData, ISO_DATE);
 }

 @Override
 String convertEntityAttributeToString(LocalDate attribute) {
  return ((attribute == null) ? null : attribute.format(ISO_DATE));
 }
}


Resources

The source code for this blog post is available as a Spring Boot 2 project on Github. Click here.

Happy coding :)

Wednesday, April 11, 2018

Building SaaS style multi-tenant web app with Spring Boot 2 and Spring Security 5 - Part 1

Software as a Service or SaaS has been around for quite some time now.  But most of the time, developers are building single tenant applications as per requirements.  These applications have just one database and one web server at their core.

Purpose of this blog post

I wanted a solution where multi-tenancy is achieved by having a database per tenant and all user information (username, password, etc) for authentication and authorization stored in a user table in the respective tenant databases. It meant that not only did I need a multi-tenant application, but also a secure application like any other web application secured by Spring Security.

I know how to use Spring Security to secure a web application and how to use Hibernate to connect to a database. The requirement further dictated that all users belonging to a tenant be stored in the tenant database and not a separate or central database. This would allow for complete data isolation for each tenant.

So I did what most people do - I googled :)  I found many blog posts and articles published on multi-tenancy and web application security, but could not found a single solution or example implementation which addresses database per tenant approach along with security.  Maybe it is too trivial of a topic and hence no blogs or articles ;-)

So I just built my own!


The solution I describe below might sound a little complicated but if you are familiar with the basics of Spring Security and Hibernate, then its quite simple, albeit a bit tedious.

I have broken up this blog post into two parts as the code to set up multi-tenancy and spring security is quite a lot. I don't want you to keep scrolling down to finish reading the blog post. :) 


What is used to build the example in this blog post?

Here, I am going to share how I built a SaaS style web app using the latest Spring Boot 2, Spring JPA with Hibernate as the JPA provider to connect to MySQL and Spring Security 5 to secure the web aplication.


What is Multi-Tenancy?

A multi-tenant application is where a tenant (i.e. users in a company) feels that the application has been created and deployed for them. In reality, there are many such tenants and they too are using the same application but get a feel that its built just for them. Typical examples are online applications for time-sheet management, project management, Scrum/Agile Sprint management, etc etc.


A more technical explanation of multi-tenancy

SaaS applications are multi-tenant applications which require tenant data isolation in the database layer. There are different approaches for achieving this data isolation.
The most widely used approaches are

  • Schema per tenant - all tenants have their own schema but these schema live in the same database 
  • Discriminator per tenant - data for all tenants is in the same schema in the database but is distinguished by a tenant discriminator column
  • Database per tenant - each tenant has a separate database


Which multi-tenancy approach is better?

There are many factors to consider before choosing a data isolation approach as mentioned above. We will not go into depth of each but focus mainly on building a multi-tenant application using the latest Spring Boot 2 framework along with JPA, Hibernate as the JPA provider and Spring Security 5.


Multi-tenancy using database per tenant approach

In many applications, especially in financial and medical domains, there is a strict need for absolute data isolation, security and privacy in multi-tenant applications. As far as my experience,  knowledge and research on this topic goes, multi-tenancy using database per tenant is the best for data isolation and security. I may be wrong and your feedback is welcome.


How does the SaaS application work?

We will build a database per tenant multi-tenant application secured by Spring Security.
In most SaaS applications, there is an entry point where a user belonging to a tenant enters the
  • tenant name (company name in most cases or some other identifier)
  • username
  • password

Step 1 - Process the login form with the extra 'tenant' field


  • The login form will present the tenant name, username and password to Spring Security for authentication.  
  • The Spring Security UsernamePasswordAuthenticationFilter filter intercepts the login form's request to the server. This filter needs to be extended so that the extra field 'tenant' can be extracted. 
  • This tenant field is the tenant database identifier and is required by Hibernate to identify the tenant database to connect to.
  • Once the tenant field is extracted by the security filter, it needs to be set in memory so that after the security filter is finished doing its job, this tenant identifier is available to the Hibernate code to connect to the correct tenant database. 
  • To make this happen, the tenant field is stored in a ThreadLocal


Step 2 - Compare the login form values with existing user in the database


  • Now that the username, password and tenant values are available to Spring Security, the AbstractUserDetailsAuthenticationProvider will use the retrieveUser() method to call upon the UserDetailsService to get the user details from the database. 
  • If the credentials from the login form match those of the result returned by the tenant database, then the authentication is successful and Spring Security will now log the user into the application and create a secure session for the user for further access and interaction with the protected resources in the application. 


Step 3 - Select the correct tenant database


  • Step 3 actually happens along side Step 2. 
  • It means that Spring Security does its job of preparing user credentials for comparison with existing users in the database. 
  • And Hibernate does its job of selecting the correct tenant database to provide such a user record to Spring Security for comparison. 

How does Step 3 work?

  • In Step 2 above, Spring Security queries the database for a user based on the login form username and tenant field. So how does Hibernate know to get the user from the correct tenant database. In Step 1 note that the tenant field is stored in a ThreadLocal for later access. 
  • Hibernate provides CurrentTenantIdentifierResolver for resolving or identifying the correct tenant id. The tenant id is extracted from the ThreadLocal storage.
  • Hibernate also provides AbstractDataSourceBasedMultiTenantConnectionProviderImpl (also see DataSourceBasedMultiTenantConnectionProviderImpl) whose job is to provide the datasource corresponding to the tenant identifier.

How Spring Security and Hibernate process the login form


How Spring Security and Hibernate process the login form

Technology Stack

I am assuming that you are comfortable with Spring MVC, Spring Boot, JPA, Hibernate and Spring Security. The example application was built using -
  • Spring Boot 2 (2.0.1.RELEASE)
  • Spring Security 5 
  • MySQL 
  • Spring JPA (Spring Boot 2 provides latest Hibernate 5 as the JPA provider)
  • Java 8
  • Spring STS IDE


Understanding the code for the application

I will describe the significant code in this section. Rest of the code is available in the GitHub repository for this example application.  The link is in the Resources section at the end. If you want to just use the code and run it, then skip to the resources section at the end of part 2 for the GitHub link.  


Project Layout

This is how my project layout is in Spring STS


File: pom.xml

Using the Spring Initialzr create a project with Spring Web, Security, Thymeleaf, MySQL and JPA. It should generate a pom.xml as follows:


Note that I have added a few extra dependencies - 

  • Cyber NekoHTML for setting ThymeLeaf in legacy mode. Why? Thymeleaf complains if there are no proper closing tags but HTML5 allows some attributes to not have closing tags. So the fix is to use this dependency. A detailed problem statement and its solution is on this stackoverflow thread
  • Apache commons-lang-3 for StringUtils
  • spring-boot-configuration-processor for helping with reading config properties. When you have annotations like @ConfigurationProperties, the STS IDE itself suggests that this dependency should be added.

This is the final pom.xml


<?xml version="1.0" encoding="UTF-8"?>
<project xmlns="http://maven.apache.org/POM/4.0.0"
 xmlns:xsi="http://www.w3.org/2001/XMLSchema-instance"
 xsi:schemaLocation="http://maven.apache.org/POM/4.0.0 http://maven.apache.org/xsd/maven-4.0.0.xsd">
 <modelVersion>4.0.0</modelVersion>
 <groupId>com.example</groupId>
 <artifactId>multitenancy-mysql</artifactId>
 <version>1.0.1</version>
 <packaging>jar</packaging>
 <name>multitenancy-mysql</name>
 <description>Spring Boot JPA Hibernate with Per Database Multi-Tenancy with Spring Security</description>
 <contributors>
  <contributor>
   <name>Sunit Katkar</name>
   <email>sunitkatkar@gmail.com</email>
   <url>https://sunitkatkar.blogspot.com/</url>
  </contributor>
 </contributors>

 <parent>
  <groupId>org.springframework.boot</groupId>
  <artifactId>spring-boot-starter-parent</artifactId>
  <version>2.0.1.RELEASE</version>
  <relativePath /> <!-- lookup parent from repository -->
 </parent>

 <properties>
  <project.build.sourceEncoding>UTF-8</project.build.sourceEncoding>
  <project.reporting.outputEncoding>UTF-8</project.reporting.outputEncoding>
  <java.version>1.8</java.version>
 </properties>

 <dependencies>
  <dependency>
   <groupId>org.springframework.boot</groupId>
   <artifactId>spring-boot-starter-data-jpa</artifactId>
  </dependency>
  <dependency>
   <groupId>org.springframework.boot</groupId>
   <artifactId>spring-boot-starter-security</artifactId>
  </dependency>
  <dependency>
   <groupId>org.springframework.boot</groupId>
   <artifactId>spring-boot-starter-thymeleaf</artifactId>
  </dependency>
  <dependency>
   <groupId>org.springframework.boot</groupId>
   <artifactId>spring-boot-starter-web</artifactId>
  </dependency>
  <dependency>
   <groupId>org.springframework.boot</groupId>
   <artifactId>spring-boot-configuration-processor</artifactId>
   <optional>true</optional>
  </dependency>
  <dependency>
   <groupId>mysql</groupId>
   <artifactId>mysql-connector-java</artifactId>
   <scope>runtime</scope>
  </dependency>
  <dependency>
   <groupId>org.springframework.boot</groupId>
   <artifactId>spring-boot-starter-test</artifactId>
   <scope>test</scope>
  </dependency>
  <dependency>
   <groupId>org.springframework.security</groupId>
   <artifactId>spring-security-test</artifactId>
   <scope>test</scope>
  </dependency>
  <dependency>
   <groupId>net.sourceforge.nekohtml</groupId>
   <artifactId>nekohtml</artifactId>
   <version>1.9.21</version>
  </dependency>
  <!-- https://mvnrepository.com/artifact/org.apache.commons/commons-lang3 -->
  <dependency>
   <groupId>org.apache.commons</groupId>
   <artifactId>commons-lang3</artifactId>
   <version>3.7</version>
  </dependency>
 </dependencies>

 <build>
  <plugins>
   <plugin>
    <groupId>org.springframework.boot</groupId>
    <artifactId>spring-boot-maven-plugin</artifactId>
   </plugin>
  </plugins>
 </build>
</project>


File: application.yml

I have worked mostly with application.properties files, but found that the YAML format is easier to use when defining multiple data sources. In this example application, I have defined two data sources multitenancy.mtapp.dataSources which are pointing to 2 MySQL databases running on a MySQL instance.


spring:
  thymeleaf:
    cache: false
    mode: LEGACYHTML5
  jpa:
    database: mysql
    show-sql: true 
    generate-ddl: false
    hibernate: 
      ddl-auto: none  

multitenancy: 
  mtapp: 
    dataSources: 
      -
        tenantId: tenant_1 
        url: jdbc:mysql://localhost:3306/dbtenant1?useSSL=false 
        username: tenant1 
        password: admin123 
        driverClassName: com.mysql.jdbc.Driver 
      -
        tenantId: tenant_2
        url: jdbc:mysql://localhost:3306/dbtenant2?useSSL=false
        username: tenant1
        password: admin123
        driverClassName: com.mysql.jdbc.Driver        

Note that spring.thymeleaf.mode is set to LEGACYHTML5. The Cyber NekoHTML dependency will then take care of not being so strict about parsing HTML5 and ThymeLeaf will not complain.


File: CustomUserDetails.java

Note that Spring Security provides the interface UserDetails. An implementation of this interface requires details about the user to be authenticated. For this, Spring Security provides a User class which can be used as is or extended. The example application extends this org.springframework.security.core.userdetails.User class to add the tenant attribute to the User.


package com.example.model;

import java.util.Collection;

import org.springframework.security.core.GrantedAuthority;

/**
 * CustomUserDetails class extends the Spring Security provided
 * {@link org.springframework.security.core.userdetails.User} class for
 * authentication purpose. Do not confuse this with the {@link User} class which
 * is an entity for storing application specific user details like username,
 * password, tenant, etc in the database using the JPA {@literal @}Entity
 * annotation.
 * 
 * @author Sunit Katkar
 * @version 1.0
 * @since 1.0 (April 2018)
 *
 */
public class CustomUserDetails 
    extends org.springframework.security.core.userdetails.User {

    private static final long serialVersionUID = 1L;

    /**
     * The extra field in the login form is for the tenant name
     */
    private String tenant;

    /**
     * Constructor based on the spring security User class but with an extra
     * argument <code>tenant</code> to store the tenant name submitted by the end
     * user.
     * 
     * @param username
     * @param password
     * @param authorities
     * @param tenant
     */
    public CustomUserDetails(String username, String password, 
                Collection<? extends GrantedAuthority> authorities,
                String tenant) {
        super(username, password, authorities);
        this.tenant = tenant;
    }

    // Getters and Setters
    public String getTenant() {
        return tenant;
    }

    public void setTenant(String tenant) {
        this.tenant = tenant;
    }

}

File: CustomUserDetailsServiceImpl.java

Spring Security provides a interface UserDetailsService which has just one method declared in it - loadUserByUsername which returns the UserDetails.  Now this UserDetails is used for authentication. In the example application code, the CustomUserDetails already defines the attributes for the User.


package com.example.security;

import java.util.HashSet;
import java.util.Set;

import org.apache.commons.lang3.StringUtils;
import org.springframework.beans.factory.annotation.Autowired;
import org.springframework.security.core.GrantedAuthority;
import org.springframework.security.core.authority.SimpleGrantedAuthority;
import org.springframework.security.core.userdetails.UserDetails;
import org.springframework.security.core.userdetails.UsernameNotFoundException;
import org.springframework.stereotype.Service;

import com.example.model.CustomUserDetails;
import com.example.model.Role;
import com.example.model.User;
import com.example.service.UserService;

/**
 * {@link CustomUserDetailsService} contract defines a single method called
 * loadUserByUsernameAndTenantname.
 * 
 * The {@link CustomUserDetailsServiceImpl} class simply implements the contract
 * and delegates to {@link UserService} to get the
 * {@link com.example.model.User} from the database so that it can be compared
 * with the {@link org.springframework.security.core.userdetails.User} for
 * authentication. Authentication occurs via the
 * {@link CustomUserDetailsAuthenticationProvider}.
 * 
 * @author Sunit Katkar
 * @version 1.0
 * @since 1.0 (April 2018)
 *
 */
@Service("userDetailsService")
public class CustomUserDetailsServiceImpl implements CustomUserDetailsService {

    @Autowired
    private UserService userService;

    @Override
    public UserDetails loadUserByUsernameAndTenantname(String username, String tenant)
            throws UsernameNotFoundException {
        if (StringUtils.isAnyBlank(username, tenant)) {
            throw new UsernameNotFoundException("Username and domain must be provided");
        }
        // Look for the user based on the username and tenant by accessing the
        // UserRepository via the UserService
        User user = userService.findByUsernameAndTenantname(username, tenant);

        if (user == null) {
            throw new UsernameNotFoundException(
                    String.format("Username not found for domain, "
                            + "username=%s, tenant=%s", username, tenant));
        }

        Set<GrantedAuthority> grantedAuthorities = new HashSet<>();
        for (Role role : user.getRoles()) {
            grantedAuthorities.add(new SimpleGrantedAuthority(role.getRole()));
        }

        CustomUserDetails customUserDetails = 
                new CustomUserDetails(user.getUsername(), 
                        user.getPassword(), grantedAuthorities, tenant);
        
        return customUserDetails;
    }
}


File: CustomUserDetailsAuthenticationProvider.java

Spring Security provides class AbstractUserDetailsAuthenticationProvider which allows subclasses to override and work with UserDetails objects. The class is designed to respond to UsernamePasswordAuthenticationToken authentication requests.

The CustomUserDetailsAuthenticationProvider implemented for this application delegates to the CustomUserDetailsService (implemented by CustomUserDetailsServiceImpl) for retrieving the UserDetails for authentication


package com.example.security;

import org.springframework.security.authentication.BadCredentialsException;
import org.springframework.security.authentication.InternalAuthenticationServiceException;
import org.springframework.security.authentication.UsernamePasswordAuthenticationToken;
import org.springframework.security.authentication.dao.AbstractUserDetailsAuthenticationProvider;
import org.springframework.security.core.AuthenticationException;
import org.springframework.security.core.userdetails.UserDetails;
import org.springframework.security.core.userdetails.UsernameNotFoundException;
import org.springframework.security.crypto.password.PasswordEncoder;
import org.springframework.util.Assert;

/**
 * {@link CustomUserDetailsAuthenticationProvider} extends
 * {@link AbstractUserDetailsAuthenticationProvider} and delegates to the
 * {@link CustomUserDetailService} to retrieve the User. The most important
 * feature of this class is the implementation of the <code>retrieveUser</code>
 * method.
 * 
 * Note that the authentication token must be cast to CustomAuthenticationToken
 * to access the custom field - tenant
 * 
 * 
 * @author Sunit Katkar
 * @version 1.0
 * @since 1.0 (April 2018)
 */
public class CustomUserDetailsAuthenticationProvider 
            extends AbstractUserDetailsAuthenticationProvider {

    /**
     * The plaintext password used to perform PasswordEncoder#matches(CharSequence,
     * String)} on when the user is not found to avoid SEC-2056
     * (https://github.com/spring-projects/spring-security/issues/2280).
     */
    private static final String USER_NOT_FOUND_PASSWORD = "userNotFoundPassword";

    /**
     * For encoding and/or matching the encrypted password stored in the database
     * with the user submitted password
     */
    private PasswordEncoder passwordEncoder;

    private CustomUserDetailsService userDetailsService;

    /**
     * The password used to perform
     * {@link PasswordEncoder#matches(CharSequence, String)} on when the user is not
     * found to avoid SEC-2056. This is necessary, because some
     * {@link PasswordEncoder} implementations will short circuit if the password is
     * not in a valid format.
     */
    private String userNotFoundEncodedPassword;

    public CustomUserDetailsAuthenticationProvider(PasswordEncoder passwordEncoder,
            CustomUserDetailsService userDetailsService) {
        this.passwordEncoder = passwordEncoder;
        this.userDetailsService = userDetailsService;
    }

    /*
     * (non-Javadoc)
     * 
     * @see org.springframework.security.authentication.dao.
     * AbstractUserDetailsAuthenticationProvider#additionalAuthenticationChecks(org.
     * springframework.security.core.userdetails.UserDetails,
     * org.springframework.security.authentication.
     * UsernamePasswordAuthenticationToken)
     */
    @Override
    protected void additionalAuthenticationChecks(UserDetails userDetails,
            UsernamePasswordAuthenticationToken authentication) throws AuthenticationException {

        if (authentication.getCredentials() == null) {
            logger.debug("Authentication failed: no credentials provided");
            throw new BadCredentialsException(
                    messages.getMessage("AbstractUserDetailsAuthenticationProvider.badCredentials", 
                            "Bad credentials"));
        }
        // Get the password submitted by the end user
        String presentedPassword = authentication.getCredentials().toString();

        // If the password stored in the database and the user submitted password do not
        // match, then signal a login error
        if (!passwordEncoder.matches(presentedPassword, userDetails.getPassword())) {
            logger.debug("Authentication failed: password does not match stored value");
            throw new BadCredentialsException(
                    messages.getMessage("AbstractUserDetailsAuthenticationProvider.badCredentials", 
                            "Bad credentials"));
        }
    }

    @Override
    protected void doAfterPropertiesSet() throws Exception {
        Assert.notNull(this.userDetailsService, "A UserDetailsService must be set");
        this.userNotFoundEncodedPassword = this.passwordEncoder.encode(USER_NOT_FOUND_PASSWORD);
    }

    /*
     * (non-Javadoc)
     * 
     * @see org.springframework.security.authentication.dao.
     * AbstractUserDetailsAuthenticationProvider#retrieveUser(java.lang.String,
     * org.springframework.security.authentication.
     * UsernamePasswordAuthenticationToken)
     */
    @Override
    protected UserDetails retrieveUser(String username, UsernamePasswordAuthenticationToken authentication)
            throws AuthenticationException {
        CustomAuthenticationToken auth = (CustomAuthenticationToken) authentication;
        UserDetails loadedUser;

        try {
            loadedUser = this.userDetailsService
                    .loadUserByUsernameAndTenantname(auth.getPrincipal().toString(),
                            auth.getTenant());
        } catch (UsernameNotFoundException notFound) {
            if (authentication.getCredentials() != null) {
                String presentedPassword = authentication.getCredentials().toString();
                passwordEncoder.matches(presentedPassword, userNotFoundEncodedPassword);
            }
            throw notFound;
        } catch (Exception repositoryProblem) {
            throw new InternalAuthenticationServiceException(repositoryProblem.getMessage(), 
                    repositoryProblem);
        }

        if (loadedUser == null) {
            throw new InternalAuthenticationServiceException(
                    "UserDetailsService returned null, "
                    + "which is an interface contract violation");
        }
        return loadedUser;
    }
}

Conclusion of Part 1

In this part of the blog post, I have explained how this application works, how to set up your project, how Spring Security is set up.

In the next part, I will show how the JPA and Hibernate part of the code is set up. Also I will show how Spring Security is tied in with the multi-tenancy Hibernate code.

Part 2